
Air Brake Adjustment
Air Brake Adjustment and In-Service Check
Air Brake adjustment (push rod travel) must be checked as part of the pre–trip air brake inspection (Section 9).
On vehicles equipped with hydraulic brakes it is possible to pump the brake pedal to compensate for brakes that are out of adjustment. This is not possible with a vehicle equipped with an air brake system with manual slack adjusters. When the brakes are adjusted by slack adjusters, the shoes are moved toward the drum. This brings them as close to the drums as possible minimizing the amount of free travel when the brakes are applied. It also reduces the volume of air used to apply the brakes.
Your company may have a maintenance crew to keep vehicles safely running. But one person alone is ultimately responsible to ensure that the brakes are operating properly before the vehicle is moved. That person is the driver.
Brake Adjustment – It’s Critical
The most important part of any braking system is the foundation brakes. If these are not in correct working order and properly adjusted, the best designed air brake system won’t be able to safely stop the vehicle.
Unfortunately, brake adjustment is often neglected. The reality is that brake failures and runaways that result in crashes are almost never caused by an air system failure, but by the absence of routine brake maintenance, or by the driver failing to check brakes on a daily basis.
Daily pre–and post–trip inspections are mandatory. The driver may be held responsible if the brakes are incorrectly adjusted or not working properly.
Brake Adjustment – It’s the Law
Federal and provincial laws require that manual and automatic slack adjusters be checked daily, during the pre–trip inspection. It is up to you, the professional driver, to ensure your vehicle has safe, correctly adjusted brakes. You the driver, can be fined if the brakes on the vehicle you are driving are found to be out of adjustment.
You’re also required by law to check your brakes before driving down steep grades that are posted with regulatory signs.
You can’t always crawl underneath your vehicle to measure air brake chamber pushrod travel, but there are devices available to help you visually check for brake adjustment.
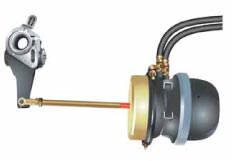
S–Cam Brake–Release
S-Cam Brake–Applied

The most common type of air brake chamber used on trucks and trailers is the Type 30. These chambers have a maximum available stroke of 2M inches. A long stroke Type 30 is designated Type 30LS, and has a maximum available stroke of three inches.
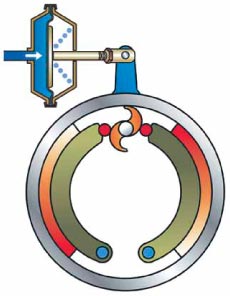
In this diagram, the brakes have been applied and the brake linings have contacted the brake drum. The brake chamber has stroked less than M of its maximum stroke, indicating that the brake is in correct adjustment.
Each brake on an axle should be adjusted to have a similar amount of pushrod travel—that is, the pushrod travel of the left brake should be similar to the pushrod travel of the right brake on the axle.
Checking and Adjusting S–Cam Brakes–Manual Slack Adjusters
S–Cam Brake–Incorrectly Adjusted and Hot Brake Drum
This brake chamber pushrod has excessive travel, but may work as long as the brake drum is cool. But it won’t stay cool for long!
Note that the brake chamber has stroked more than ½ of its maximum, which means that this air brake chamber pushrod has excessive travel and the brakes are in need of adjustment.
When the brake drum is cool and with normal brake application pressure, the brake will seem to be effective, so it is easy to be lulled into a false sense of security.
Air brake equipped vehicles rarely “lose” their brakes. Rather, brake failure occurs because the driver has failed to check and correctly adjust the brakes.
Cast iron brake drums expand when heated, causing the air chamber to stroke further and further as the temperature rises.
If an unforeseen event required the driver to make a sudden stop, the brake chamber could bottom out, and braking power would be greatly reduced.
On long downgrades, the expansion of hot brake drums can cause a total loss of braking and result in a runaway.
Even incorrectly adjusted brakes may seem to work when brakes are lightly applied.
This could result in brake fade under moderate to heavy braking, or on a downhill.
S–Cam Brake–Incorrectly Adjusted and Cold Brake Drum
Drivers seldom have the luxury of having the use of a pit and hydraulic jacks so that brake adjustment can be done with wheels off the ground. However, brakes can still be adjusted very accurately with the wheels on the ground using one of the following methods. Be sure that the vehicle is safely parked with the wheels blocked. The air system should be at full pressure and the spring parking brakes released. Turn the engine off so that you can listen for air leaks. There are two methods of checking for correct adjustment, but the measurements that indicate the need for adjustment are different. Pry Method of Free Stroke Measurement
You will need:
- A wrench
- A marker to measure pushrod travel
- Sturdy clothing suitable for crawling under the vehicle
- A flashlight
You should also wear eye protection and a bump cap. To begin, make sure system air pressure is at least 90–100 psi and all parking brakes are released.
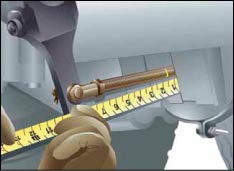
- Make a mark on the pushrod where it exits the brake chamber.
- Note: It is sometimes difficult to mark the pushrod at this location. Alternatively, mark the center of the clevis pin on the slack adjuster arm.
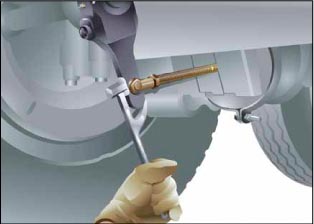
- Pull the pushrod out from the brake chamber, using a tool for leverage.
- Measure the distance between the chalk mark and the face of the brake chamber ½ to ¾ of an inch of free stroke is a good range for a type 30 standard stroke brake chamber. If this distance is more than ¾ of an inch, the brakes need adjustment.
Applied Stroke Method
(service brake application)
The applied stroke (brake application) method requires two people—one to apply the brakes and one to measure travel.
If you have a device to apply and hold the service brakes on, you can use the brake application method without needing another person.
Checking the pushrod stroke by applying the brakes.
Brake Adjustment Indicators
New air brake chamber pushrods have a marking (usually red) to indicate when brake adjustment must be done immediately. If the pushrod travel becomes excessive, the marking will show.
Don’t wait until the red marking is exposed before adjusting the brakes.
If the red marking on the pushrod (at the chamber face) is visible, it indicates that the brake is dangerously out of adjustment and it needs immediate attention.
The applied stroke method is the preferred method and is also a method recommended by commercial fleet maintenance supervisors.
- With the brakes released, make a mark where the pushrod exits the brake chamber.
- With the engine off, make a series of brake applications to reduce the reservoir pressure to between 90 to 100 psi.
- Apply and hold a full brake application (90 to 100 psi).
- Measure the distance between the mark and the face of the brake chamber. The difference between measurements is called the chamber applied stroke.
While checking air brakes look for other brake component wear and excessive play including:
- S–cam bushing wear
- S–cam spline wear
- Slack adjuster play (worn gear)
- Clevis pin wear
Brake Adjustment–Manual Slack Adjuster

With a typical Type 30 standard stroke brake chamber, you must adjust the brakes if pushrod travel is:
- more than ¾ of an inch using the pry method of free stroke measurement, or
- more than 1-½ inches using the brake application—applied stroke measurement method.
Note that these are maximum measurements. You should adjust the brakes if your measurements approach these limits.
Most manual slack adjusters have a spring–loaded locking sleeve that must be pressed in and held so the adjusting bolt can be turned.
Depending upon the orientation of the slack adjuster, the correct direction to turn the adjusting bolt may be clockwise or counterclockwise. Watch to ensure that you are tightening and not loosening the slack adjustment.
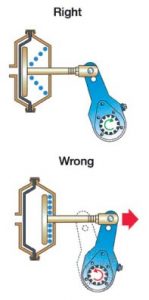
With a wrench of the proper size, usually a 9/!^ inch, depress the locking sleeve and turn the adjusting bolt while watching the end of the camshaft. The camshaft will rotate slightly as the bolt is being turned. If you are turning in the right direction, the cam will rotate in the same direction that it would if the brakes were being applied, as shown by the arrow on the cam end in the diagram below.
The push rod and the slack adjuster arm should never move away from the brake chamber while turning the adjusting bolt.
If when turning the adjusting bolt, the slack adjuster is pulling the pushrod out of the chamber, stop. The adjusting bolt is being turned in the wrong direction.
Once the proper direction is established, continue turning until solid resistance is met. This indicates that the brake linings have contacted the brake drum.
If the brake has no dust shields, or if you can see the brake shoes and linings through an inspection slot, you can visually verify that the linings have contacted the drum.
Backing off the adjusting bolt about 1⁄3 of a turn should establish correct running clearance between the lining and drum. Be sure the locking sleeve re–engages the bolt so that the adjustment will not back off.
It is common, especially on tandem axle units, for the adjusting bolts on one axle to adjust in one direction, while the other axle requires an opposite turn. It is not uncommon to find that the brakes on one or the other axle have been mistakenly backed off, creating a serious safety hazard.
After adjusting, verify that there is sufficient clearance by again pulling or prying on the slack adjuster arm, and re–measuring the free stroke, remember that ½ inch is ideal.
Adjusting S–Cam Brakes with Automatic Slack Adjusters—Why—When—How
Automatic slack adjusters are entirely different than the manual types.
Once properly installed, automatic slack adjusters should not need manual adjustment. If an automatic slack adjuster is found to stroke beyond the maximum allowed, this usually indicates that there are brake problems that need to be repaired by qualified brake service personnel.
Automatic slack adjusters still need to be regularly checked to ensure that correct adjustment is being maintained.
Pushrod strokes with automatic slack adjusters are usually slightly longer than with well–adjusted manual slack adjusters. While a manual adjustment may temporarily shorten the stroke, the automatic slack will soon re–set to its designed stroke.
Manufacturers recommend that automatic slack adjusters be checked by a mechanic at each chassis lubrication interval, or from 40,000 to 80,000 km.
However, the National Safety Code of Canada, as well as federal and state laws in the U.S. require a daily check of brake adjustment as part of a pre-trip inspection. Also, in certain mountainous areas of North America, trucks are required to stop and check brakes before proceeding down long grades. The checking is required regardless of whether manual or automatic slack adjusters are used.
Prior to manually checking slack adjuster stroke, ensure tractor spring parking brake control valve and trailer supply valve are open. Ensure reservoir air pressure is above 90 psi and make a full brake application and release. Repeat this process 6 times—these brake applications will be adequate to cause an automatic slack adjuster to adjust. A light brake application will not cause the adjustment.
If after making 6 full brake applications with reservoir pressure above 90 psi, a pushrod stroke is excessive, the automatic slack adjuster has either failed, been incorrectly installed, or there is a problem within the foundation brake. Manual adjustment at this time is only a stop–gap measure so the vehicle can be driven to a service depot for inspection and possible replacement.
Most manufacturers of automatic slack adjusters specify that pushrod stroke be checked by making a 90 to 100 psi application. If you have no application pressure gauge, turn the engine off and pump the reservoir pressure down to between 90 and 100 psi–then make a full application.
Automatic slack adjusters should only be adjusted or repaired by a qualified mechanic except in an emergency. Follow the manufacturer’s instructions in carrying our any adjustment.
Emergency Manual Brake Adjustment—Automatic Slack Adjusters
THESE ARE EMERGENCY PROCEDURES ONLY. A REPAIR OR REPLACEMENT MUST BE MADE AS SOON AS POSSIBLE.
Be sure that the vehicle is safely parked with the wheels blocked. The air system should be at full pressure and the spring parking brakes released.
With a typical Type 30 standard stroke brake chamber, you must adjust the brakes if pushrod measurements are:
- more than ¾ of an inch using the pry method of free stroke measurement, or
- more than two inches using the brake application—applied stroke method.
Four types of automatic slack adjusters
Note that these are maximum measurements. You should adjust the brakes if your measurements approach these limits.
If you make an emergency adjustment of an automatic slack adjuster, be sure to record it on your daily post–trip inspection report.
It is strongly recommended that you obtain the service data books for the make of automatic slack adjusters that you are using. They contain all the information needed to keep them operating properly, including lubrication requirements, initial setup, inspection and testing. They are available where truck parts are sold.
Slack Adjusters with Hexagonal Adjusting Bolts
If the slack adjuster has a hexagonal (six-sided) adjusting bolt, the brakes may be set up by turning the adjusting bolt in a clockwise direction until the lining contacts the drum. Backing off the adjusting bolt by ½ a turn should restore running clearance. Backing off may take considerable force and may be accompanied by a ratcheting sound and feel. This is normal.
These two types of automatic slack adjusters both have hexagonal adjusting bolts.
Slack Adjusters with Square Adjusting Bolts
If the slack adjuster has a square adjusting bolt located at the bottom end of the body, do not attempt adjusting until a spring–loaded pawl that meshes with internal teeth is disengaged. These units have a ¾ inch hexagonal (hex) cap located on the slack adjuster body. Some of these hex caps are equipped with a round “button” that can be pried up approximately 1⁄32 of an inch and held, using a screwdriver. On units not equipped with the button, the hex cap, spring and pawl must be removed. With the spring and pawl disengaged, an adjustment can be made.
These brakes must be set up with a counter–clockwise turn until the lining contacts the drum. Turning the adjusting bolt ½ a turn clockwise will restore running clearance. Release the button or re–install the spring and pawl if they were removed. This type of slack adjuster has a square adjusting bolt.
Disc Brake Adjustment
There are a number of makes and models of air disc brakes, each with a different adjustment procedure. It is therefore recommended that you consult the manufacturer’s manual for adjustment or service.
Wedge Brake Adjustment
Manual adjusters:
- Hoist or jack wheels off the ground.
- Remove dust cover from adjusting slots at two places on each brake. On twin chamber units the adjusting slots are in the backing plate below the forward chamber and above the rear chamber. If star wheel adjusting bolts are not found at these positions, the brake has been assembled on the wrong side of the vehicle. The single chamber units have adjusting slots in the backing plate on each side of the chamber.
- Adjusting bolts have right–hand threads. Turning the wheel by hand, use an adjusting spoon to turn the star wheel until the shoe develops a heavy drag on the drum. Then back off the bolt to a very light drag on the drum.
- Repeat for the other shoe on that brake assembly.
- Replace the dust covers in the adjusting slots.
- Repeat the above steps on the other brake assemblies.
There is no reliable substitute for physically checking brake adjustment.
After a Brake Adjustment
At the first stop after adjusting the brakes, check each brake drum or rotor for temperature. An extra hot brake drum indicates that you have over adjusted it.
Only when all brakes are properly adjusted will the system be able to absorb the required amount of energy to bring the loaded vehicle to a safe stop under extreme conditions. Remember that poorly adjusted brakes may appear to be working at slow speeds on light air application. The only way to be sure your vehicle brakes are properly adjusted is to physically check the push rod travel at each wheel.
In-Service Checks
In some areas signs are posted in advance of steep or long downgrades. These signs indicate that the driver must stop the vehicle in the pullout area and inspect the braking system before proceeding. Check that:
- the compressor is maintaining full reservoir air pressure;
- push rod travel is within limitations on all chambers;
- there are no air leaks;
- the glad hands and the lines are secure;
- the drums, bearings and tires are not overheating;
- the trailer supply valve is operating properly.
This should be used as an in–service check only and not mistaken as a daily pre–trip air brake inspection.
The driver must be aware of the condition of the vehicle’s braking system at all times. This can be done by:
- watching the pressure gauges;
- hearing the warning signals; and
- feeling the braking response of the vehicle.
By this method of observation, the driver should be able to notice any defects developing in the braking system and be aware that service or adjustment is required.
Maintenance and Servicing of the Air Brake System
Ensuring that the vehicle is in proper condition to drive is the responsibility of everyone involved.
Preventive maintenance checks are designed to prevent mechanical failures that could result from neglect. These checks cut repair costs by detecting minor mechanical defects which would otherwise develop into major breakdowns.
Preventive maintenance may be assigned to a maintenance crew or to the driver. However the driver must ensure that the braking system is in safe operating condition before the vehicle moves.
Click Below for More Information
Air Brake Adjustment Myths
There is some misinformation about air brakes that you may hear. Most of this is not critical, but the following three myths could be dangerous, if believed.
Myth #1: Air Brake adjustment can be checked from the cab by making a full brake application and checking for an initial pressure drop of between 8–12 psi. The assumption is that as the brake chambers stroke further and further, that more air volume will be required, and this should show up on the reservoir gauges.
Fact #1: Modern trucks have very large air reservoirs, and even if all the brakes had excess pushrod travel, the pressure drop would not reach the 8–12 psi range. Also, most truck reservoir gauges do not have markings fine enough to accurately estimate such pressure changes.
Myth #2: With the brakes applied, a 90-degree angle between the centre of the slack adjuster arm and the chamber pushrod is a good indication that the brake is in correct adjustment.
Fact #2: The 90-degree angle is more dependent on the length of the chamber pushrod than on brake adjustment. Also, to prevent interference between the slack adjuster and suspension parts, some manufacturers will vary the angle up to plus or minus 10 degrees.
Myth #3: A clockwise turn of the adjusting bolt on a manual slack adjuster will set up the brakes.
Fact #3: Depending on the orientation of the slack adjuster on the brake assembly, the correct direction to set up the brakes may be clockwise, or counter-clockwise. On vehicles with tandem axles, it is common to find that one axle sets up with a clockwise turn, while the other requires a reverse direction.
Section Summary
- Why is it so critical to check slack adjustment?
- Who is ultimately responsible for the brakes on a vehicle?
- Who will be fined for operating a vehicle with brakes improperly adjusted?
- What are the dangers of operating a vehicle where the pushrod travel is barely within tolerance when the brake drums are cold?
- What items should you carry to measure and adjust slack adjusters?
- What is the first thing you should do when preparing to measure slack adjustment?
- How much pressure should you apply to the foot valve when measuring slack adjustment using the applied stroke method?
- How do you know you are turning the adjusting bolt in the correct direction when adjusting a slack adjuster?
- What is an advantage of automatic slack adjusters?
PALMER DIFFERENCE
Your Quality Equipment Partner
You run your business, we provide the equipment. It’s a partnership that works.
Additional transportation capacity is a strategic business asset, but it doesn’t have to drain your financial resources. Palmer offers flexible leasing terms that allow you to manage cash flow and position your company to take advantage of changes in your business. Unlike banks or other finance companies, we understand trailers and storage containers and have the capacity ready to fully service your equipment needs.
Palmer will provide you with consistent quality and superior service, on-demand. Palmer equipment is maintained by our experienced team to meet our stringent, 80-point inspection. You can be confident our equipment is ready when needed.
Palmer offers affordable, professional delivery and pickup, saving you the expense of transportation to and from your location.
Your Qualified Team
What truly sets us apart is the total experience – the way we put an entire company, not just a fleet of equipment, at your command. Palmer hires the mechanics, maintains the fleet, attends to the logistics, and ensures quality. To oversee your needs, a dedicated team works for you to assure our services are executed with precision.
PALMER IS
Flexible
Palmer Leasing is privately-owned and operated. We are not encumbered by corporate bureaucracy, allowing us to better serve our customers.
Responsive
With credit decisions within one business day, you have the equipment you need quickly.
Personal
Experienced leasing consultants will help you obtain the right equipment for your needs.
A Good Partner
Palmer functions as a partner and investor in your business, providing you with the flexibility of allowing you to optimize cash flow, better serve your customers, and focus on the growth of your business.
Knowledgeable
Sales, service, and support personnel have many years of experience and training.
Ready
The Palmer fleet is one of the strongest and most varied in the industry; it is composed of equipment from the industry’s leading manufacturers and is large enough to support your unique needs.
You run your business, and we provide the equipment. It’s a partnership that has worked since 1965.